logo

Pulsation and vacuum

Topics

7 min read

How pulsation works Pulsator maintenance The vacuum system

Getting the pulsation and vacuum systems right is key to efficient and comfortable milkings. This page will cover the benefits of proper pulsation, how it works, and the essential components of a pulsation system.

Read more on setting optimal pulsation rates and ratios, maintenance tips, troubleshooting advice, and recommended vacuum levels based on milk line height.


Get pulsation right and maintain a high flow rate from the teat while stimulating milk flow.

Benefits of an effective pulsation system include:

  • Cows are milked out in the least amount of time.
  • Pain and discomfort felt by the cow when milk flow ends is minimised.
  • The fluid that can collect in the teat tissues when there is no milk flow (potentially causing teat end damage and mastitis) is reduced.

How pulsation works

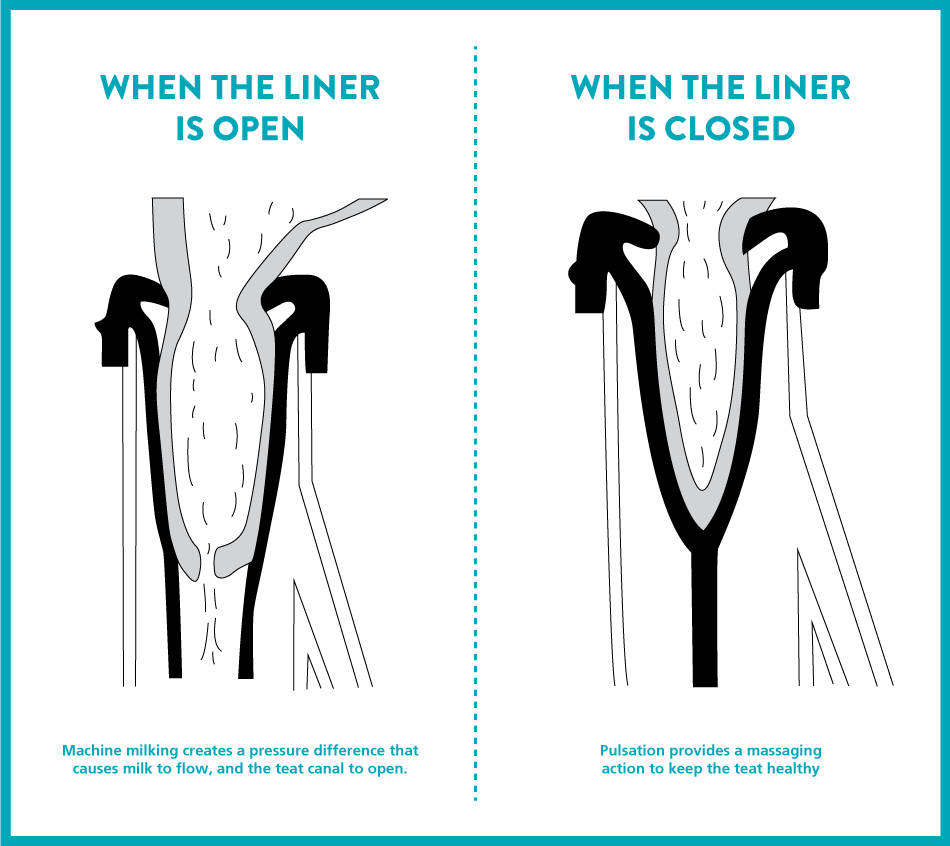
The pulsation system allows cyclical changes in pressure (vacuum) in the chamber around the liner. This causes the teat cup liner to open allowing milk to flow, then closes the liner again around the teat, massaging the tissues and reducing congestion.

What is a pulsation system?

All pulsation systems are made up of a pulsator (an air switching device), a source of vacuum, and connecting pipelines and flexible pulse tubes that connect the pulsator to the pulsation chamber, formed between the teat cup shell and liner.

The purpose of pulsation is to limit the amount of congestion and oedema occurring in the teat tissues during machine milking, which can lead to cow discomfort, teat congestion and potentially teat end damage (hyperkeratosis). Pulsation helps maintain a high rate of milk flow from the teat within each pulsation cycle and helps stimulate good milk let-down.

As with all machinery, maintenance of pulsators is important. Ensure milking machinery is completely assessed, and faults rectified, at least once every 12 months by a registered milking machine tester that holds a current practicing certificate from the MPTA (Milking and Pumping Trade Association).

Pulsator types

Pulsators can be pneumatic, electronic or mechanical. The number of clusters connected to the pulsator will affect pulsation. Pulsation systems can operate on the teats in two ways:

  • Simultaneous (4x0)
    • Pressure is applied to, and released from, all the teats simultaneously.
    • Bores of 8-9mm are typical.
  • Alternating (2x2)
    • Pressure is applied to two teats while the other two are at rest and then alternate.
    • Bores of 6-8mm are typical.
  • The number of clusters connected to the pulsator will affect pulsation.

How the pulsation cycle works

There are two parts to a pulsation cycle:

  1. Milking or Open Phase - when the pulsation chamber is under vacuum, the liner moves to its open position, as above. Milk is drawn out of the teat, as it moves from a place of high pressure (i.e. in the udder) to a place with a low pressure (i.e. vacuum in the milk tube).
  2. Resting or Closed Phase - Air is admitted into the pulsation chamber, which increases the pressure to the same as the atmosphere, exceeding the pressure (vacuum) on the other side of the liner wall, causing it to collapse around the teat. Milk flow slows and stops.

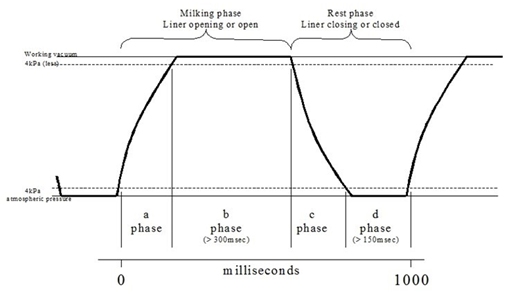
The graph (below right) is an example of a pulsation cycle, at a pulsation rate of 60ppm. In the diagram the Milking phase covers a + b, and the Resting phase covers c + d.

Milk starts to flow from the teat during the a-phase (or opening phase) of pulsation.

Milk flow continues throughout the b-phase (the open phase) and into the first part of the c-phase (the closing phase).

Milk flow slows at a time corresponding to a point about 50-75% down the c-phase curve and there is no milk flow throughout the d-phase and into the first part of the a-phase (opening).

Pulsation open and close

Example of a pulsation cycle

Pulsation cycle graph

What settings to use for pulsators

Pulsators have two main settings that are commonly referred to as 'pulsation rate' and 'pulsation ratio'.

  • Pulsation rate is the number of times the pulsator goes through a full open and close cycle per minute, measured in pulses per minute (ppm).
  • Pulsation ratio is the percentage of time the pulsator is in the milking (open) phase compared to the resting (closed) phase.

Pulsators are set optimally within the following ranges:

  • Rate 50 to 60 ppm
  • Ratio 60:40 up to 70:30

The first number of the ratio refers to the percentage of the cycle in the milking phase (a+b) and the second number refers to the percentage of the cycle that is resting (c+d).

The optimal pulsation ratio maximises the milking phase duration while ensuring sufficient rest time to prevent teat congestion or teat end damage.

Research has shown that the d-phase must be at least 150 milliseconds (equivalent to 15% of the cycle if the pulsation rate is 60 ppm) to provide adequate rest and ensure no increased risk of mastitis.

Field experience has led to the recommendation that the d-phase is at least 20% of each cycle to allow for some decline in pulsator performance until the next scheduled maintenance.

How pulsation affects milking efficiency

Many dairies have been set up with a ratio of 60:40 and rate of 60 ppm. In some situations, milking efficiency can be improved by increasing the period that the liner is open in each pulsation cycle. This is achieved by extending the ratio to 65:35 or 70:30. When making this change it is important to do a machine check to ensure a d-phase of at least 150 milliseconds, and 20% of the cycle, is still being achieved.

When the pulsation ratio is increased, the teat will be exposed to vacuum for longer in each pulsation cycle. It is important to minimise the time that the teats are exposed to vacuum once milk flow slows down or stops. This can be achieved by applying maximum milking times (MaxT) or setting Automatic Cup Removers (ACR’s) low flow threshold to achieve earlier cup removal.

Typically, increasing the pulsation ratio to 70:30 is only recommended in these types of situations:

  • The milking machine is fitted with ACR’s, which can be set for early cup removal to minimise overmilking.
  • The farm is already using a MaxT milking strategy to shorten the milking times of the slowest 20% of cows.
  • The cows are being milked once a day, which increases the volume of milk being harvested at each milking. This lessens the risk of overmilking, as there is more time available to complete the routine tasks during each row or rotation.

Pulsator maintenance and troubleshooting

  • Clean pulsator filters regularly (especially in grain feeding dairies), and carry out the simple pulsator checks (below).
  • The pulsation airline is not included in the circulation cleaning system - it needs to be washed out annually and the drain valve needs to be cleaned occasionally. Check with your milking machine service provider on a recommended wash method.
  • Replace any worn components of pulsator units as per manufacturer instructions – pulsator components can be purchased as kits.
  • Have your milking machinery professionally checked every season.

D-phase troubleshooting

If the pulsation d-phase is below 20% when the pulsators have been set to 70:30, then the most common causes are:

  • the pulsators need servicing
  • the pulsation rate is set too high – consider dropping to 55 ppm
  • the pulsator is operating too many clusters, or
  • the length of tubing from the pulsator to the cluster is too long.

Electronic pulsators typically require new service kits to be installed every 2000 – 4000 hours (varies between models).

When operating pulsators at higher pulsation ratios, such as 65:35 or 70:30 it is important to ensure they are regularly tested and serviced, at least once every 12 months. Ensure any internal pulsator parts are replaced as per the manufacturer’s guidelines.

Common pulsation faults

The subtle effects of inadequate pulsation may be the single most important cause of poor milking performance and machine-related mastitis problems.

Regular occurrence of one or more of these problems during milking may indicate poor pulsation or a fault in the milking machinery:

  • poor teat condition in the herd
  • cluster slips or falls
  • irritable cow behaviour i.e., kicking cups off during milking
  • incomplete milking out of cows
  • slow milking times for cows

More information, including triggers for action can be found in the milking machine care page.

When the machine running, but not milking cows, test for these issues which can lead to poor pulsation:

  • Look for cracks, splits, or kinks in the pulse tubes, foreign material (dirt, grit, feed particles, or insects) under the pulsator valve seats or lodged in the air inlet ports.

  • Listen closely to each pulsator as a first check for uniformity between units. The sound of air entering the external air port should be regular and intermittent. This simple check is made more sensitive by partially covering the pulsator air port with a finger. A continuous hiss indicates a leak (usually grit or dirt) under the pulsator valve seat. Check that the pulsator air filter or air port is absolutely clear.

  • Feel that all liners are opening and closing fully in a pulsation cycle by turning on the vacuum shut-off valve to each cluster in turn and inserting a thumb into each teat cup. The liner should close around your thumb if the pulsator is working correctly.

If faults are found with the pulsation system during milking, or if you suspect the pulsation is not working correctly, then contact your milking machine service provider.

The vacuum system

The vacuum pump

The purpose of a vacuum pump is to extract air continuously from the milking machine system. This maintains a vacuum which allows the milking machine to operate.

Vacuum pump performance is assessed by measuring the quantity of air flow produced. Use a specialist to ensure the correct size is chosen. They should also be tested annually with an airflow meter.

  • Oil ring vacuum pumps are the most common type. These use an oil layer to create a seal between the side and ends of the blades.
  • Liquid ring vacuum pumps are also popular. These use water rather than oil as the seal.
  • Blower-type vacuum pumps are also being routinely installed as an alternative option to the standard oil seal and liquid ring pumps.

Vacuum regulators 

Vacuum regulators maintain the desired level of vacuum in the milking machine system, despite fluctuations in air demand.

They work by constantly allowing excess air to enter the milking machine so the vacuum pump is continually removing the extra air that the milking machine doesn’t require.

Some installations now feature variable speed drive systems to regulate the vacuum level. These operate by electronically monitoring the vacuum level and then controlling the vacuum pump itself to either increase or decrease its speed.

Vacuum levels

The vacuum level must be maintained at a level suitable for the milk line height. The figures shown are generalisations, open to minor adjustment, somewhat dependent on the design of the milking system but are considered safe.

Milk line height above cow platform (m) Vacuum (kPa)
1.8 48
1.6 46-48
1.4 44-46
1.2 42-44
Low line 40-42
Vacuum level in relation to milk line height based on that recommended by the
NZ Milking and Pumping Trade Association.

Notes:

  • Use the lower vacuum levels listed with large bored long milk tubes or in wet, windy weather e.g. at the start of spring calving when the teats are more easily damaged.
  • With automatic cluster removers, depending on their internal head loss, and after spring, the higher level is acceptable.
  • In practice, it is wise to start the season off with the vacuum level low rather than high, i.e. never start spring calving with a vacuum higher than 46 kPa regardless of the milk line height.
  • Increase to around 48 kPa for herd testing to compensate for the head losses in commonly used milk meters.
Last updated: Sep 2023
Share:

Related content

Milk cooling

Milking

8 min read

Clusters

Milking

5 min read

Cleaning your milking system

Milking

11 min read

Liners

Milking

7 min read