Composting dead stock
Topics
2 min read
Composting is an effective way to dispose of dead stock while creating a useful product and minimising the potential for groundwater contamination. If managed well, composting can be low cost and relatively odour free.
In some locations there may be no collection service and water tables are too high to bury stock or use offal pits.
In composting, microbial processes break down organic wastes, leaving a humus or manure-like product. Temperatures reach up to 70°C in a stack and the heat generated in the process kills pathogens and prevents fly incubation.
Locate your compost stack at least 100 metres (the further the better) from waterways such as streams, lakes, ponds and drainage ditches. Try to locate stacks on a high point of the land to minimise the amount of water flowing through the bottom of the stack. If your stack is on sloping land create a diversion bank around the upper side of the stack to keep surface water out.
Consider ease of access – distance to stack from farming practices – and be sure you can access it in all weather conditions. Locate it at least a hundred metres from the dairy shed and fence it off so stock can't get into it.
Finally, think about neighbours, residences and public roads. While odour is not normally a problem, having to watch dead stock being handled outside the kitchen window may not be appreciated.
Large round bales of low-quality hay can be used to form the bin. Place bales end to end to form walls for a three-sided enclosure. Alternatively, concrete can be used for the floor and walls. While it is more costly, concrete is more durable and requires less room than bales.
Bin design is not critical but should ensure easy access with a front-end loader. Four bins are ideal: two for primary composting, one for secondary composting, and another to stockpile fresh sawdust.
They should be located close together for easy movement between them. For bin size, plan on 0.25m2 per 1000kg contents. Overly large bins should be avoided. Bins 12-15m2 work well – or two bales deep by three bales wide.
You will need to add a carbon source to the dead stock. Sawdust is particularly good because of its small particle size and high absorbency so leaching is minimal. Old sawdust from calf sheds is perfect for this. Straw can also be used but will generally take longer to compost and may require roofing to stop the leaching. Wood chips and shavings don’t work well due to their larger particle size.
Finished compost can also be used as a primary compost ingredient. This reduces the amount of sawdust required and also has the composting organisms already established.
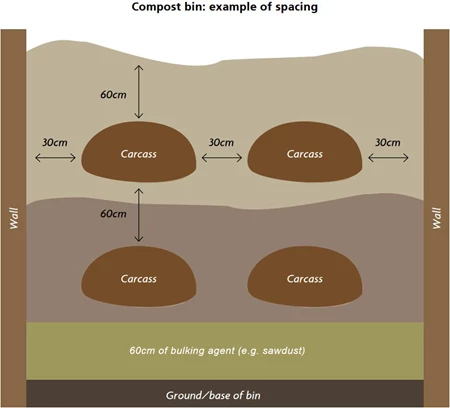
Composting requires the proper ingredients be placed in bins in the correct proportions and at the right times. Start Bin 1 by placing sawdust on the ground to a depth of 60cm. Place carcasses in the bin as soon as they occur and split the stomach. Carcasses should be at least 30 cm from the sides of the bin and fully covered with at least 60cm of sawdust. Carcasses placed directly on the ground or on concrete will not compost properly. Carcasses may need to be recovered in a day or two once sawdust has settled. Never leave legs, hooves, ears or any body part out of the sawdust pile. (Cleaving or cutting the carcass into smaller bits may make it easier to manage and will increase the spread of decomposition.) Continue placing and covering carcasses until the bin is full.
Here is the process to follow:
After nine months – three months in collecting, three months primary composting and three months in secondary composting – the compost should look black and humus like. Some parts (like the skull and teeth) may still be identifiable but will be soft and crumbly.
Keep sawdust as dry as possible as this will aid in faster breakdown of the carcass.
Finished compost is a great fertiliser, but cannot be spread onto grazed pastures or anywhere ruminants can access it. This is because the composting process may not kill all bugs. Biosecurity (Ruminant Protein) Regulations 1999 prohibits the feeding of ruminant protein in any form (including fertiliser) to a ruminant.
Suitable uses for the finished compost include incorporating into cultivated soil (except in situations where stock could ingest soil, e.g. forage crops), domestic gardens, under shelterbelts, and in plantation areas.
See Dead stock disposal for information about disposal options.
Now’s the perfect time to check in, plan, and set up for a strong season. We’ve pulled together smart tips and tools to help you stay ahead all winter long.
Whether you prefer to read, listen, or download handy guides, we’ve got you covered with trusted tools to support your journey every step of the way.
Put our proven strategies and seasonal tools to work. Boost production, support animal health and watch your profits hum.
Tools that are backed by science, shaped by farmers and made for this season.
That’s Summer Smarts.
Autumn Smarts brings together the research-backed tools that build resilience and boost performance.
The tools and insights you need to navigate the season with confidence. Backed by research and built for results – that’s Winter Smarts.

