Blueprints Building
Topics
7 min read
Building a new dairy farm is a complex, time-consuming process that requires careful planning and consideration. This page guides you through the key decisions and factors involved in choosing the type and size of the dairy and yard. It highlights the importance of selecting the right location on the farm, considering factors like compliance, geotechnical advice, ground levels, farm race integration, prevailing wind, tanker access, and proximity to other facilities. It also covers the various elements of good dairy design and the need for technology and automation, providing a comprehensive timeline for building the dairy. Always consult with professionals to ensure the best results.
Building a new dairy can be a challenging, costly and time-consuming process.
If well designed, both rotary and herringbone dairies can be:
This page will guide you through the considerations and decisions required after deciding the type of dairy and yard, and their sizes. Key elements to get right are the location of the dairy on the farm, the design of the dairy and that each step of the build is done in sequence.
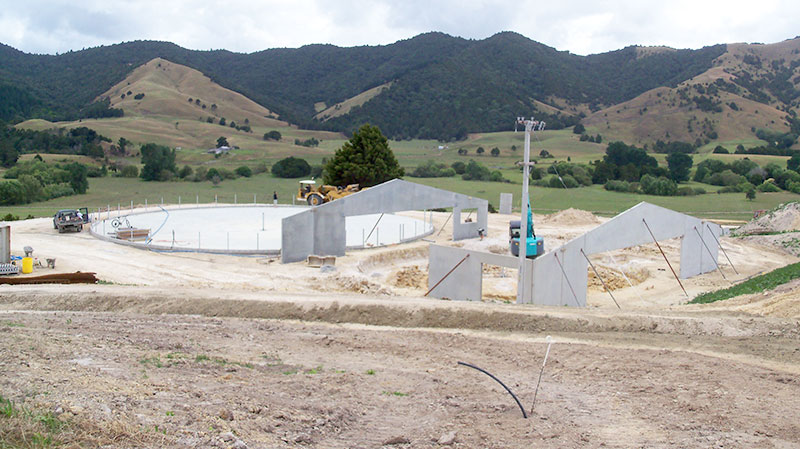
Choose the best site available for the dairy, as the site will dictate a lot of the design options, and have a significant influence on the build cost. Below are some of the factors to consider for the proposed dairy site:
A new farm dairy or alterations to an existing dairy must be assessed to ensure compliance with NZCP1 and other relevant requirements.
The site suitability, premises and plant must be assessed by a Farm Dairy Assessor prior to work starting, and on completion of the building, before milk can be collected for supply. Compliance includes the requirement that all local authority consents have been obtained e.g. building, effluent discharge and consent to take water. Full requirements for the dairy site can be found in Section 5 of NZCP1.
Regional and District Councils may have minimum distance requirements between the dairy and land boundaries, houses, public spaces, waterways or other features. Requirements may vary from Council to Council, and rules may be updated from time to time, so it pays to check requirements and apply for any required consents early.
For some sites, it may be wise to seek geotechnical advice to assess the site suitability for the building and pond placement.
Soil type, strength and stability, risk of erosion, slips or slumping and any hydrological issues such as groundwater or flooding risk should be assessed. Soil types such as peat pose design challenges and risks.
A gently sloping site is ideal for utilising gravity to convey water and effluent and may minimise earthworks to achieve desired yard and dairy levels.
Using gravity is generally more reliable than pumps, and saves pumping costs. For example fresh water tanks may be able to be placed above the shed so water for the plate cooler can be fed by gravity. Washdown water could feed into effluent ponds by gravity which is turn, if sufficient head, could drive the travelling irrigator.
The yard, and platform/bail area of the dairy will generally be of similar height. When building a rotary dairy on a flat site it will need to be decided if the yard or the milker/cupping area is at ground height. It is common to raise the yard and have the milkers area at ground height.
However, less earthworks may be required if a ‘pit’ is dug around the platform for the cups-on cups-off area, leaving the yard and building at ground level. If the rotary has an internal milk line this would require a small central area to be dug. Heights between this and the effluent pond would need to be checked.
The water table must be well below the minimum depth for any excavation requirements (e.g. the effluent pond)
Yard at ground level with 'pit' for the platform.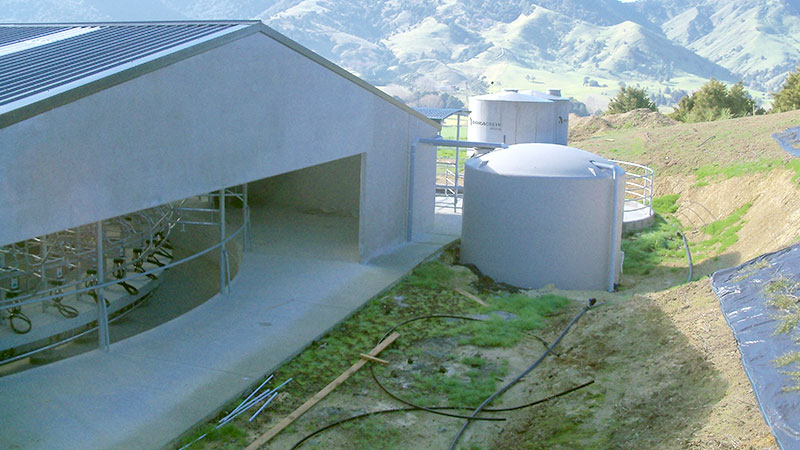
Pit for the rotary platform, building and yard at ground level.
Optimise the race and dairy layout for cow flow and functionality. This is of prime importance. Poor cow flow can lead to a number of issues including stock bottlenecks and excess effluent generation, as well as on-going frustration for staff.
For rectangular yards, enter at the rear of the yard, either on the end of the yard, or either corner.
For circular yards, the entry point for should be as far from the point of entry into the dairy as possible, allowing for cows to fill the circular area facing toward the dairy.
Try and minimise the amount of turns the cows need to make. For more information visit the Track and Yard section and see below Additional resources.
Siting of dairy relative to main farm race and tanker access
Having open sides on the North-East/North-West sides will assist keeping the inside dry and free from algal growth but be mindful of the prevailing wind and impact on cow and milker comfort.
Where possible, placing the vat stand on the South side of the building will shield the vats from sunlight for much of the day, reducing cooling energy requirements. However, most of the heat gain comes through wind not the sun if a single-skinned vat used, hence shelter is also important.
The tanker track and tanker park area need to meet dairy company requirements.
The tanker pad should drain to the effluent system, but be on a raised concrete apron to avoid drainage water from the tanker track and surrounding areas entering the effluent system.
Information on dairy company requirements can usually be found in the suppliers’ handbook – check it is the latest version.
Consider proximity to three phase power, adequate potable water supply and other amenities as these can be significant costs. Ideally the site will have room for all current facilities as well as growth in the future.
Preferably effluent from silage stacks, feed pads, wintering barns, and any other areas where there is effluent accumulating will be able to drain into the dairy’s effluent storage pond (utilizing natural fall and gravity will save pumping costs).
You may wish to expand the dairy, yards, pad areas or ponds in the future and you will need plenty of room for vehicle access, including stock and supplementary feed truck turn around points etc. around this area. Consider adding all of these facilities into your initial design, even if you have no immediate plans to go ahead with them.
Incorporating all the elements of good dairy design, to ensure efficiency and milker and cow comfort, into building plans or blueprints it tricky – particularly when building on a site with existing buildings or with challenging terrain.
The blueprints below illustrate how elements of good dairy design are brought together. Critical areas are annotated with explanations. They are intended as a visual aid only, but should provide enough information so that when modified to suit your specific site that the elements of good dairy design can be maintained.
There are many labour saving and decision support technologies on the market. Most require a significant investment so it is important to understand what a technology offers.
Consider the following:
Where possible assign dollar values to calculate a Net Present Value (NPV) or an Internal Rate of Return (IRR).
For example, a 2014 study evaluated the return on installing automatic cluster removers and accompanying technology (automatic drafting, teat spraying and bail retention arms) to eliminate the cups-off operator for a 770 cow herd. Labour costs were assumed to be $30/hr.
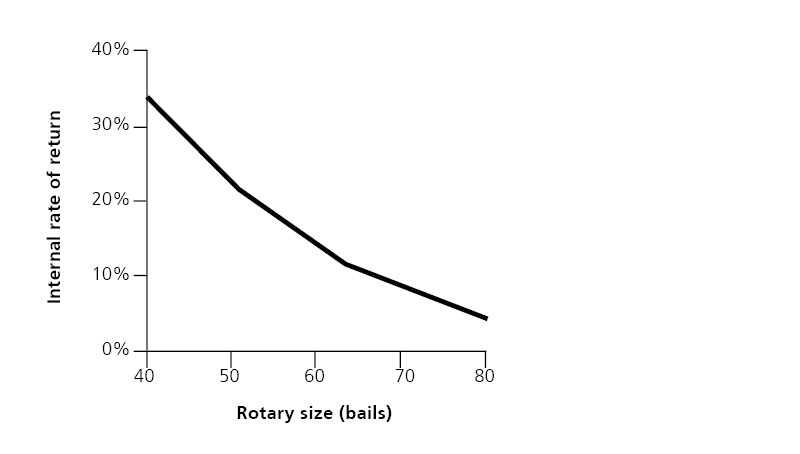
Internal rate of return for investing in automatic cluster removers (and associated labour saving technology) over a range of rotary sizes.
Building a new diary can be a daunting task. In many situations it’s left up to the farmer to be the project manager, co-ordinating the dairy builder, plant installer, electrician, plumber etc. It is difficult to make significant changes once concrete is poured.
Now’s the perfect time to check in, plan, and set up for a strong season. We’ve pulled together smart tips and tools to help you stay ahead all winter long.
Whether you prefer to read, listen, or download handy guides, we’ve got you covered with trusted tools to support your journey every step of the way.
Put our proven strategies and seasonal tools to work. Boost production, support animal health and watch your profits hum.
Tools that are backed by science, shaped by farmers and made for this season.
That’s Summer Smarts.
Autumn Smarts brings together the research-backed tools that build resilience and boost performance.


